Implementing a simple HTTP multi-threaded web server in Java
Mar 18, 2022
Disclaimer: At the beginning of every
file in the GitHub Repo of this project,
there is a comment on if the code is mine. At some points I was inspired by others who did this already. See the list of sources I learned from here.
I set myself a strict deadline and decided to only work on this in my free time for a week.
In this post:
- How does an HTTP server work?
- What needs to be implemented
- Implementing and handling the configurations
- Establishing a connection and using (server) sockets
- Multi-threaded accepting of connections and handling multiple requests
- Responses
- Graphical UI
- Potential To-Do improvements
Please to run this server, run the main method in application package in the GUI class. You will get a window with button to start the server. To configure go to src/main/resources and configure the port or webroot in configuration.json.
How does an HTTP server work?
A server is a computer. It needs to be connected to the network to be able to receive the requests. It will be listening through ports (for example 80 for not encrypted and 443 for encrypted traffic). Usual requests are files or something in the file system (web root). The server will look for the file(s) that match the request and sends a response back to the browser through the established connection.
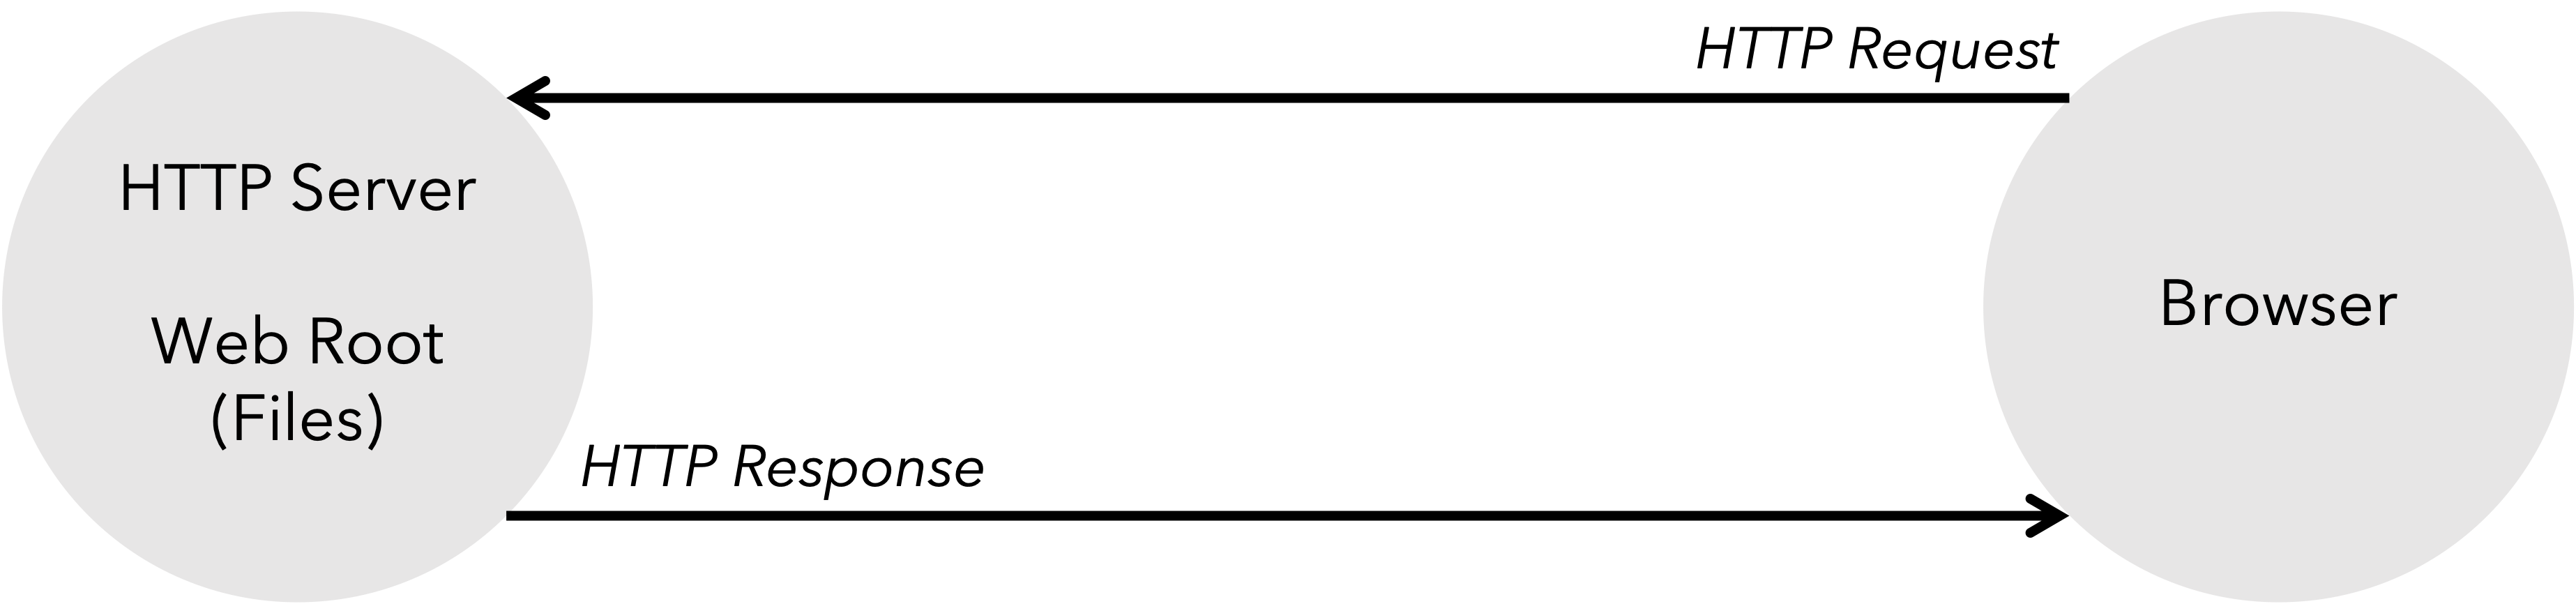
After the browser receives the response, the server closes the connection. There is therefore a new connection established for every single request coming from the browser. We can now sum up what we need to do.
What needs to be implemented
Server must be able to:
- listen to a configurable port and therefore to read the configuration files (JSON) and how to write them
- establish and handle multiple connection(s) (multi-threaded) between the browser and the server
- parse and understand requests messages coming from browser
- compose the response based on the request
Implementing and handling the configurations
For keeping the configurations in one place, we will use JSON.
We need to configure:
- port (int): so far one, we can configure more later, our server will listen to this port
- webroot (String): pathway of where the files are saved
{
    "port": 8080,
    "webroot": ""
}
We will now write two classes. One class for handling the configurations and
one for its representation (a simple setter and getter of the port and webroot).
Both will be in the package of the httpServer.
The actual configuration class is trivial and will look like this:
protected class Configuration {
    private int port;
    private String webroot;

    private int getPort(){
        return this.port;
    }

    private void setPort(int port){
        this.port = port;
    }

    private String getWebroot(){
        return this.webroot;
    }

    private void setWebroot(String webroot){
        this.webroot = webroot;
    }
}
This where we retrieve the configuration data from. It will basically be an object containing the configuration data.
Now we need to write the configuration handler. Our handler needs to be able to (those will be separate functions):
- load the Configuration
- get the Configuration (and return it obviously)
protected class ConfigurationHandler{
    private Configuration config; //the config that will be loaded
    //default constructor

    //this method might throw exceptions (wrong path, permission problem and so on)
    protected void loadConfig(String path){
    }

    //only if config is loaded, otherwise throws an exception
    protected void getCurrentConfig() {
    }
}
Now we need to figure out a way how to parse the JSON file and create the Configuration object. This is a pretty complicated step (at least if you're doing this for the first time).
Parsing JSON in Java
The entire project will use Maven for easily keeping dependencies in order and for the actual parsing of the JSON file the Jackson library which can be used for parsing and generating JSON files. It has an Object Mapper class that can process JSON files and create Java objects out of them, which is exactly what we need.
Defining the dependencies
The pom.xml file looks like this:
Java class handling the JSON files
In this class, that we will make use of the ObjectMapper() which we will import from the jackson.databind.
There are two ways to get/use the ObjectMapper. You can either just use the default one or configure your own.
If you dont want to configure it at all, you can just use public static ObjectMapper objectMapper =
new ObjectMapper();. Otherwise create the function that returns the ObjectMapper and configure
it within the function before you return it.
Another part of the Jackson library is the JsonNode. This class represents the structure of the original JSON
file. We will first want to transform/map the JSON into this class (object). We define the function
getJsonNode() to get this JsonNode representation. It will take in one argument - the string
representation of the JSON file.
//part of the package

import com.fasterxml.jackson.databind.JsonNode;
import com.fasterxml.jackson.databind.ObjectMapper;

public class JsonHandler{

    private static ObjectMapper objectMapper = new ObjectMapper(); //this uses the default ObjectMapper()

    public static JsonNode getJsonNode(String jsonInString) throws IOException{
        return objectMapper.readTree(jsonInString);
    }
}
Using this if we for example take our JSON configuration file to test the output
of this getJsonNode() function. That is, for the following JSON:
{
    "port": 8080,
    "webroot": ""
}
We have string representation "{"port\":8080, "webroot":"web"}" and the
ouput of the function getJsonNode() is an JsonNode object on which we can for example call:
//import previous class JsonHandler and JsonNode
    String jsonInString = "{\"port\":8080, \"webroot\":\"path\"}"
    JsonNode myJson = Json.getJsonNode(jsonInString);

    myJson.get("webroot").asText(); //returns "path"
At this point we need to move the JsonNode object into the Configuration object/class. For that we need to define another function in the JsonHandler class.
We can do this using the ObjectMapper and its treeToValue(JsonNode, Class <T>). This function returns the class we want the JsonNode to transform into (we pass this as a second argument).
At the same time we can define a function that is the inverse to JsonToClass. This function will accept an object as an argument ans will return the JsonNode object.
Another thing that can be useful is to get a way to get the Configuration as a string, which is basically a JSON.
Now we have everything we need to process and to work with the JSON files.
Configuration Handler
We can now proceed to implement the methods of the ConfigurationHandler class.
-
loadconfig(): we need to find the file at given path and read it completely. Good way to save its content could the StringBuffer. Let's just simply iterate over the content of the file and useread()to read its content.read()will return-1as soon as we reach the end of the file. After that, we can make use of the functiongetJsonNode()we defined in the previous part to get the JsonNode representation. -
getCurrentConfig(): This is just a simple method that will return the current configuration. (Mind theNullPointerException()). A possible improvement here could working out the exceptions in a better way.
This should be everything we need to be able to work with configurations. Now we just need to import it into the main HttpServer class and instantiate and we can use it.
Assuming the previous JSON Configuration this config would return 8080 on congif.getPort() and "path" on config.getWebrot().
Establishing a connection and using (server) sockets
To establish the connection, we need to have a socket that is going to listen to the port. Java has a net library which provides classes for networking applications. One of them is the Server Socket. A server socket waits for requests to come in over the network. It performs some operation based on that request, and then possibly returns a result to the requester. To create a server socket bounded to a specific port, we construct the object and pass the port number as a parameter. We can easily retrieve this from our Configuration object.
Now we can say we want the socket to wait for the connection to be established. The function accept() listens for a connection
to be made to this socket and accepts it. The method blocks until a connection is made. Once a connection is made, Socket is returned.
A socket is an endpoint for communication between two machines.
Socket has two methods we will want to use:
getInputStream(): returns an input stream for reading bytes from this socket. Based on the input stream we will decide what to return as a response to the browser.getOutputStream(): returns an output stream for writing bytes to this socket. Using the output stream (and its methodwrite()) we will be able to send the response to the browser
Now that we have basically all we need for single-threaded web server - let's make it work in parallel such that multiple connections and requests can handled independently.
Multi-threaded accepting of connections and handling multiple requests
Let's now create a different package tools where we will handle connections in multi-threaded scenario.
I will create two classes (both extending thread (and therefore implementing Runnable).
Acceptor: In this class I will basically create threads and wait for the connection to be made by a request coming from a browser. As soon as I establish connection and receive thesocket, I am gonna start a new thread of anExecutorClass.Executor: In this class I will handle the requests (understand them) and build the appropriate response. Once a response is build we can fire it back to the browser usingOutputStreamas explained above.
Building multiple connections (Acceptor)
Acceptor will work as follows. The constructor will accept the port and the web-root.
As already explained we overrun the method run(), which is basically a main method for this
thread started by start(). This method will wait for a connection and once it is made it will start
a new thread Executor. There might be some IOE, so we need to wrap it into try/catch code.
Let's build the executor now.
Handling the requests and building the Executor
Based on what we get through the inputStream we are
able understand what the browser requests and form an
appropriate response. As mentioned earlier, we will assume
that the request is an path to a certain file.
An HTTP Request consists
of request line, headers and message body. But I will only have enough time to implement basic request line
requests (not taking headers and so on into consideration). A request line is the first line, it consist of three attributes:
- Method (for example GET, POST, ...)
- URL
- an HTTP version
We now override the run() method as we extend the thread class. We can parse the InputStream and read all three properties of a request line.
A typical browser request looks similar to the following example:
Out of that we will only take the first line. That is the desired request line:
Mind method="GET", url="/", httpVersion="HTTP/1.1".
Responses
Response in general consists of statusLine, headers, and the message body(= web).
These parameters must separated by a SEPARATOR which is by convention \r\n. That will
be true for all reponses in general.
We will do the absolute minimum and consider GET and HEADER methods.
Let's therefore check if the request uses one of these and if not we will return a
501 Not Implemented error. As soon as I identify an error I will compose an error response.
501 Not Implemented
404 File Not Found
Let's now check if we have the file the request is asking for.
For that let's create a new method loadFile which will parse the
file into String or return "404" if such file is not in our webroot.
Now let's check the URL as well as the httpVersion in the run() method.
505 HTTP Version Not Supported
Response with no errors
If nothing failed, we obviously send the correct one.
Graphical UI
Last thing (and probably least) I want to do is the graphical interface to start the server.
I will just create a class GUI implementing the ActionListener and create a main method.
Since this a trivial code, I will just paste the code and the result.
The server is now working and can be tested on localhost as described at the very beginning.
Window before starting the server

Window after starting the server

Potential To-Do's
- Test
- Thread pooling
- Proper exception handling
- Proper logging
- Clean up request handling
List of sources I learned from
I am listing the following links which I used to learn about everything I needed to know to make this work.